
*Warning: If bathroom/toilet grunge is not your cup of tea, no need to read further in this post! I’ll admit when we started on this project I was pretty taken aback, and I grew up on a farm!
There was so much to love in our house from the very first time we viewed it. It was so overwhelmingly perfect for us that the little imperfections we could identify were no big deal. For example, the bathroom flooring was an area that would definitely need work; discoloration of the linoleum indicated a toilet leak, which the sellers explained had been fixed. At the time I didn’t think too much about it, but there was really only one way to be sure, and that was to take it apart and look at the wax seal and surrounding area.
We figured that we could replace the bathroom flooring ourselves; after all, we had already decided that we would replace carpeting with engineered hardwood ourselves in any home we ended up purchasing.
Fast forward 4 years- We still hadn’t repaired the bathroom flooring, because the more I examined the bathrooms and thought about it, the more I realized I needed to do additional research. In other words, the more I examined and thought about the project, the more scared I got about the scale of this project, and we were busy with other stuff, so we put it off… I know, bad! But finally, a month ago I felt we’d figured out what was needed to in order to tackle this project.
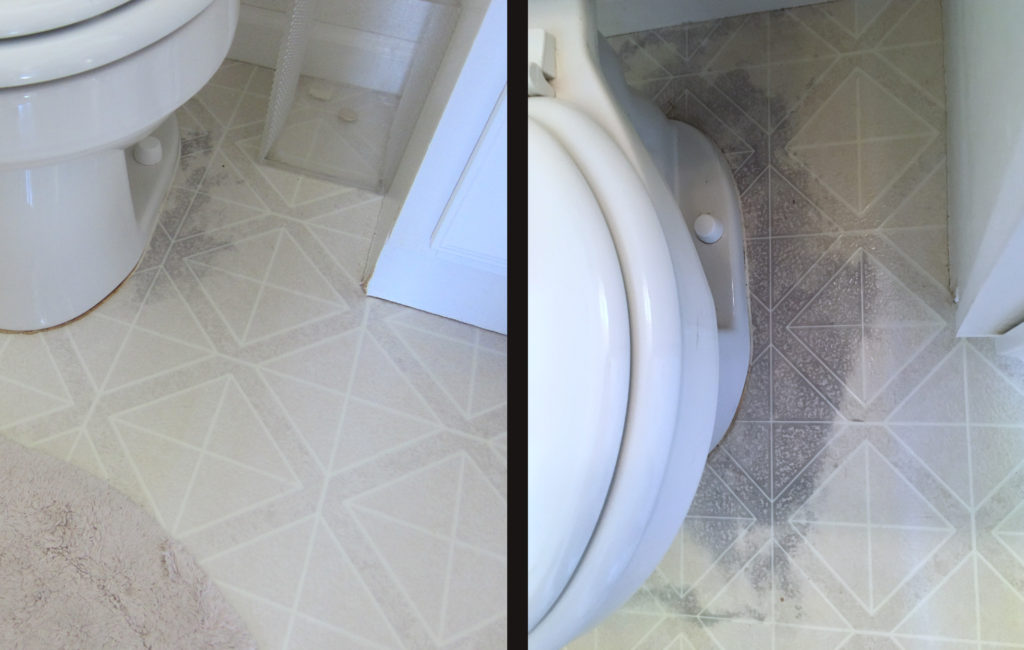
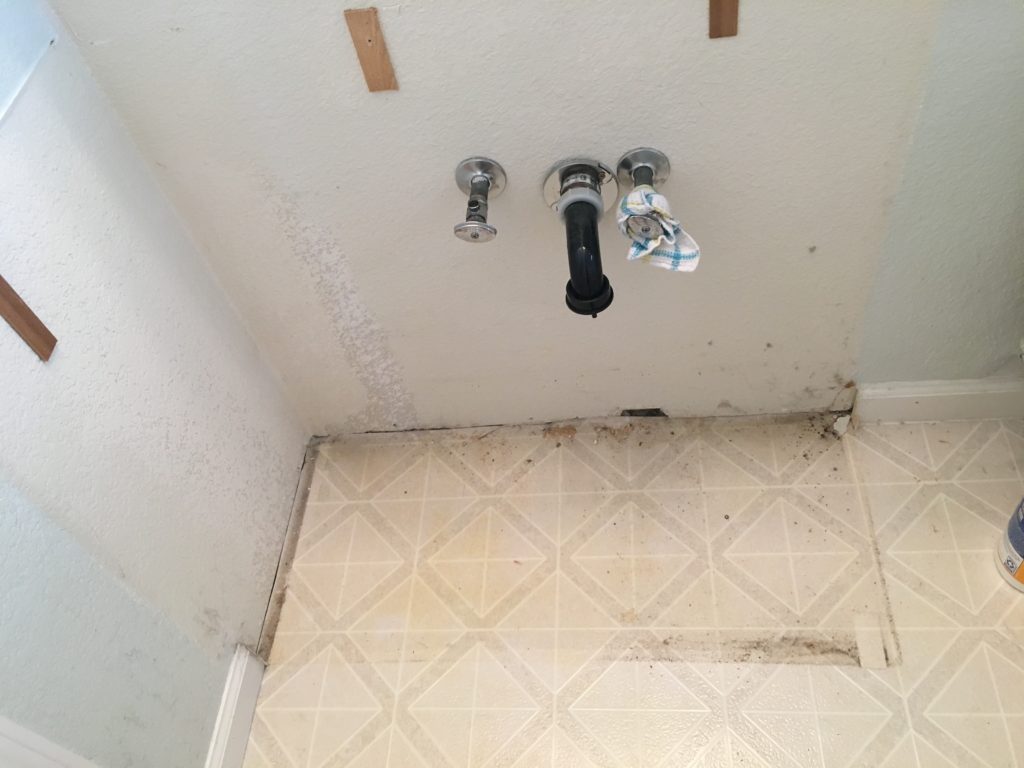
The images below show that the toilet leak in the master bath actually was not repaired and further damage occurred as result. 🙁
The following research really helped: The following is a list of issues and the corresponding link for information that addressed the issue.
- Toilet leak – how toilets work
- Toilet repair – toilet flange repair
- Sheet vinyl installation – making a template and installation
- Caulking – perfect caulking
- Caulking toilet base – for imperfect floors
I actually watched way more than these videos, which made me feel more confident about the job. An additional benefit to having watched so many toilet repair/replacement videos is that it gave me some mental preparation for what we saw when we removed our toilet!
*Aside: We specifically wanted to replace the existing linoleum with luxury sheet vinyl because, firstly, I wanted something watertight and continuous in the bathroom.
Secondly, we wanted a flooring that was of similar thickness to the existing linoleum so that it would fit perfectly under the existing hallway flooring transitions. The sheet vinyl thickness was appropriate according to the specifications.
Thirdly, I hoped for a relatively simple fix; I knew there was nothing but cement underneath the bathroom linoleum and sheet vinyl can accept such conditions.
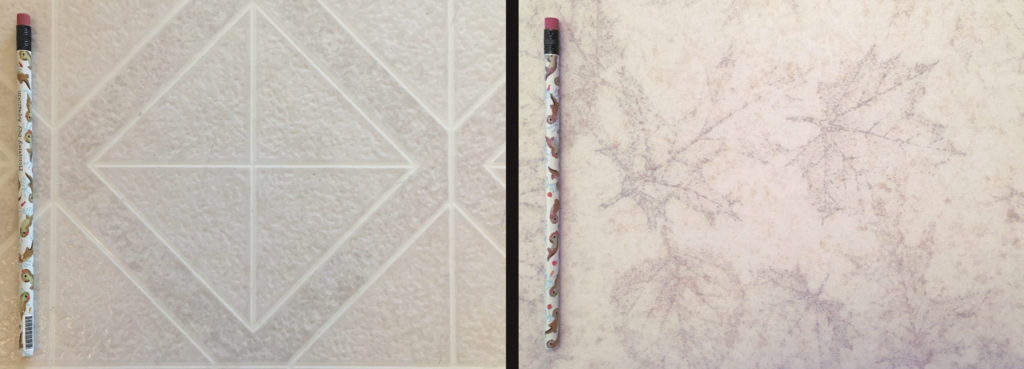
Lastly, I plain like vinyl in the bathrooms because it has some give/cushion, it gets neither hot nor cold, and if I drop stuff on the floor, things are less likely to break. Lastly, I found a pattern that I love.
Our process is detailed below, pardon the wordiness, this was one of the ‘scariest’ projects we’ve done so far, and I think understanding the details really helped!
Materials (approximate cost 2019) :
~100sqft Luxury Sheet Vinyl flooring – Armstrong Framingham Natural B6080 ($294 total).
*We only needed about 60sqft, but in our case, it was cheaper to buy 100sqft from FloorCity than it was to buy 60sqft elsewhere. It turned out to be a good thing; a corner of the vinyl sheet was scuffed but there was enough for us to avoid using that area and still have plenty for our project.
1 gallon Henry 650R Releasable Bond Pressure Sensitive Adhesive for Fiberglass Sheet Vinyl Flooring ($32/gal)
*We decided to go with this because we really needed only a small quantity, and we figured this might be a bit more forgiving in terms of the ‘open time’. Additionally, according to our research, roller application was easier than trowel application for adhesive, and this allowed for roller application. We were really happy we went with this option.
Heavy Duty 27inch Extendable Roller ($30)
*This was necessary to remove air bubbles and make sure the vinyl flooring is properly adhered to the subfloor.
Adhesive rollers, roller tray, brush – Mini paint rollers (~$10 total), tray ($3/each), sponge brush (~$1/each)
*Our bathroom floor space is so small (about 5x6ft) that a 4inch roller was perfect to allow us to get around corners.
Toilet stuff – Extra thick Toilet Bowl Wax Ring ($4.00/each), Toilet bolts and caps (~$10 total), Toilet spacers (~$10 total).
*We were lucky that there wasn’t anything broken with our toilet flange. We did find out that the bolt for the toilet in the master bath, the one that was still leaking, had a broken bolt. We also found that the floor around the toilet was not very level; the toilet spacers ensured a level re-installation of our toilet.
Caulking materials – Silicone caulk (~$9/each), profiling tools (~$10)
*We used about 3 tubes of caulk, one because I didn’t have the profiling tools yet and wasted a bunch ‘wiping it off’, another because we ran out and figured the caulk that evolved methanol during cure was more tolerable than the ones that evolve acetic acid during cure, and a third because I realized for the second bathroom that almond colored caulk looks better against the vinyl. Also, I didn’t use the Kramer fugi kit profiling tools here, I just used a kit I got at the local hardware store.
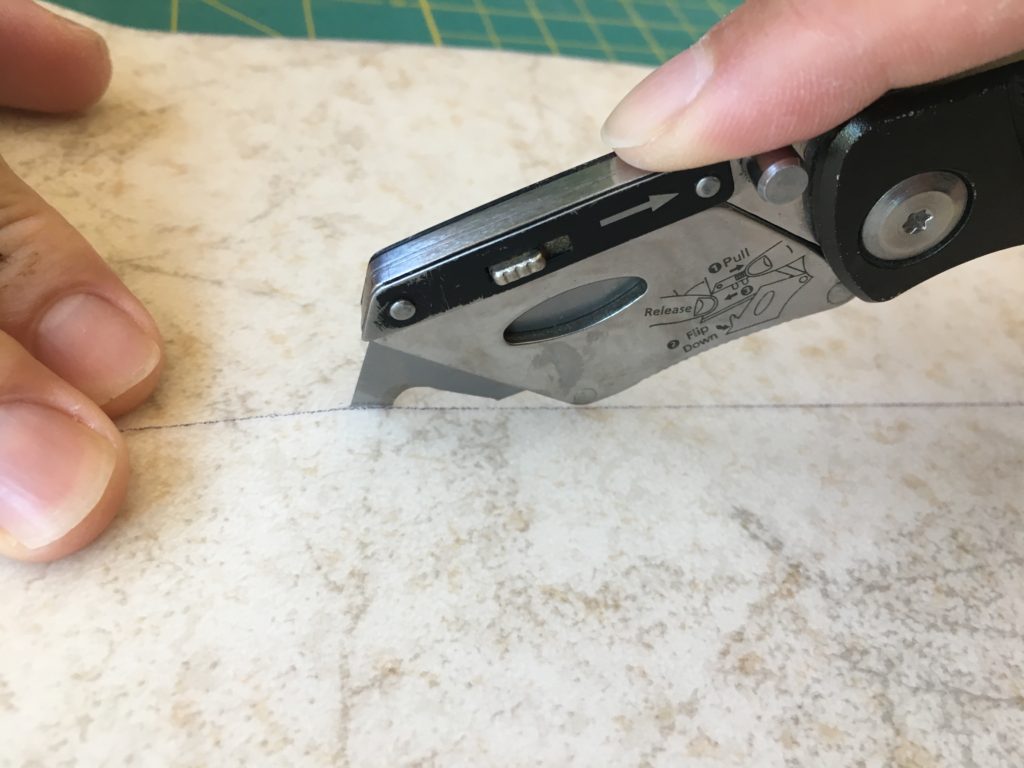
Hook blades for utility knife to cut sheet vinyl ($5/10 pack)
Cleaning and Protective supplies – paint scrapers, Lysol wipes, scrubs, towels, disposable gloves, face masks, paper towels, etc. Cost: unknown
*I don’t have an idea how much we spent on cleaning supplies because we already had some on hand. But this was a dirty job, so get ready to purchase additional supplies.
Miscellaneous: Patching compound if subfloor is not even, touchup paint for walls, baseboards if existing baseboards can’t be reused.
Method (all pictures shown are of same hallway bathroom unless specified):
- Remove the vanity and toilet. We removed the vanity first because it was easier to make room to maneuver the toilet. Set aside and clean up as we’ll be reusing it. Make sure to plug the toilet hole with a rag.

Area of bathroom vanity. 
After removal of both vanity and toilet.
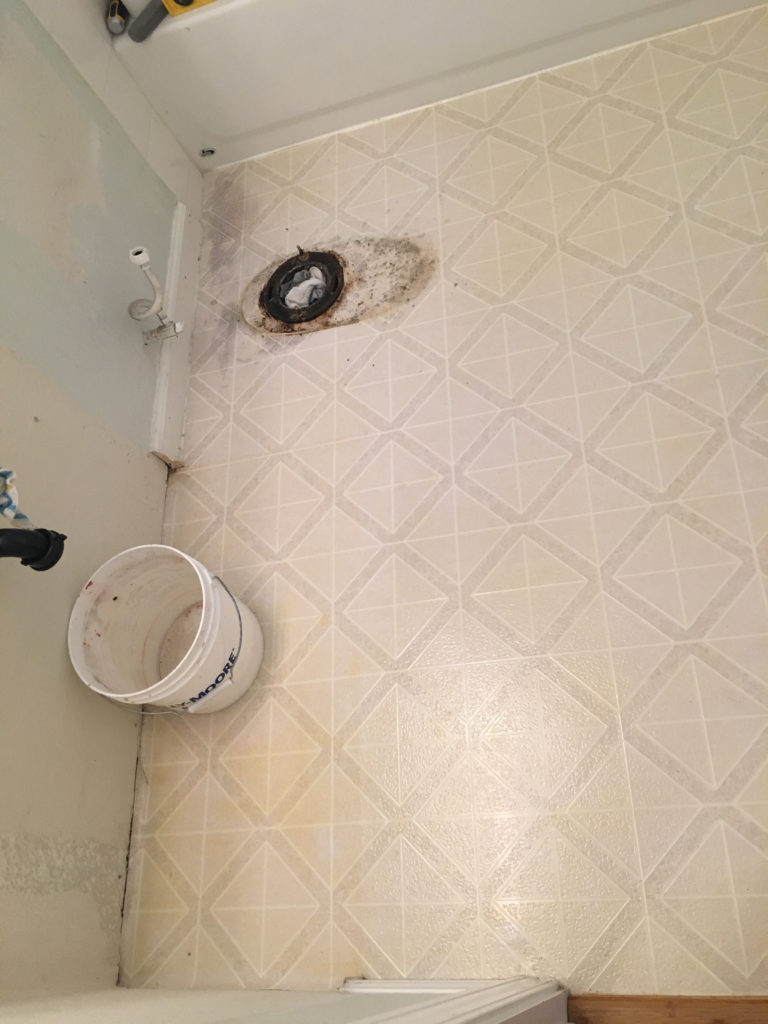
2. Remove the baseboard and caulk from the walls/floors.
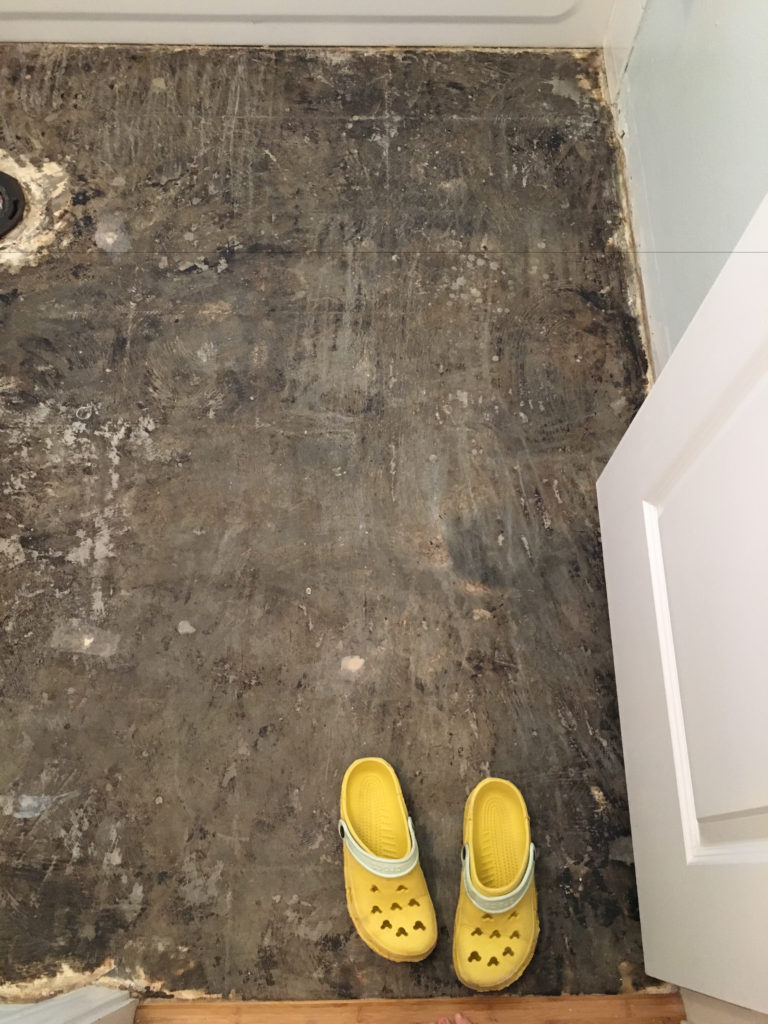
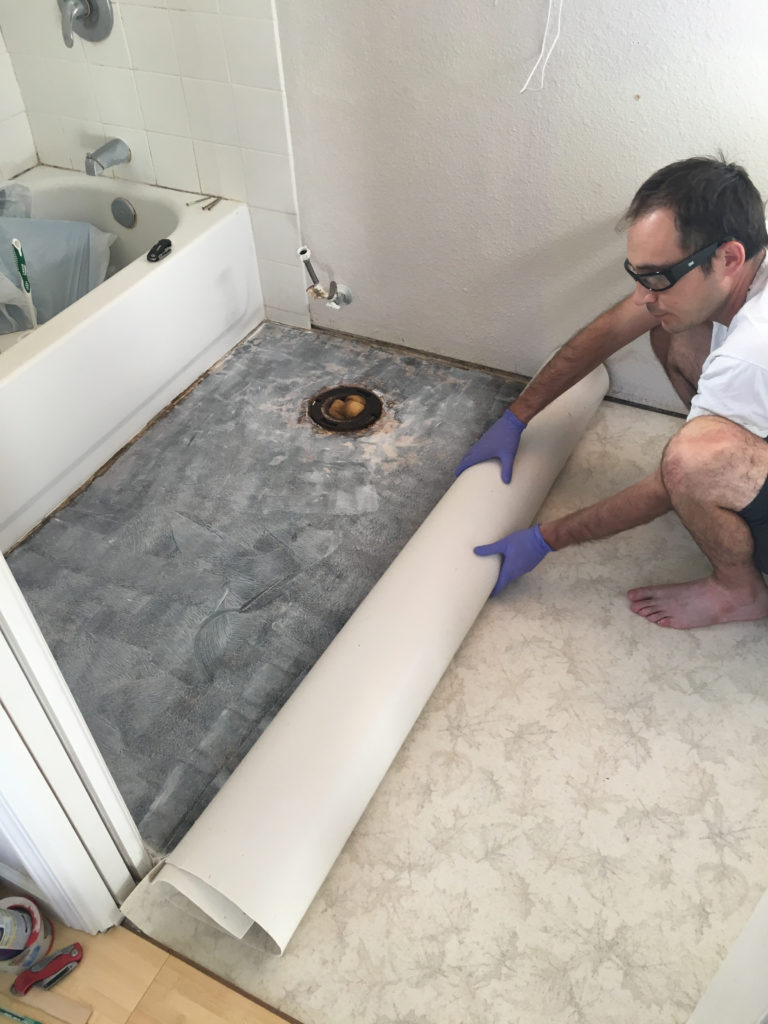
3. Remove the flooring. In our case, it was just a matter of peeling it up. Make sure you’re wearing masks and eye-protection!
*Note: Before we ripped all the linoleum up willy-nilly, we first removed a small sample and sent it to a local environmental testing lab to make sure there was no asbestos. It came back clean, so we moved forward!

4. Clean/prep the floor area. As you can see above, there’s a bunch of linoleum backing and black tar-like adhesive on the floor. We can’t just throw down more adhesive and our new vinyl; the floor isn’t even and the dirty stuff will interfere with proper adhesion of the new vinyl. So we poured some hot water on, scraped with our paint scrapers, and then scrubbed and scrubbed and scrubbed with Bon-Ami and Bar-Keeper’s Friend, and whatever we thought would help!
*Note: The trick really is hot water, scrape, and scrub. We also cleaned the area around the toilet flange as best as we could, being careful to use cleaning supplies that were not corrosive to our cast iron toilet flange. Did I mention the house was built in 1955?
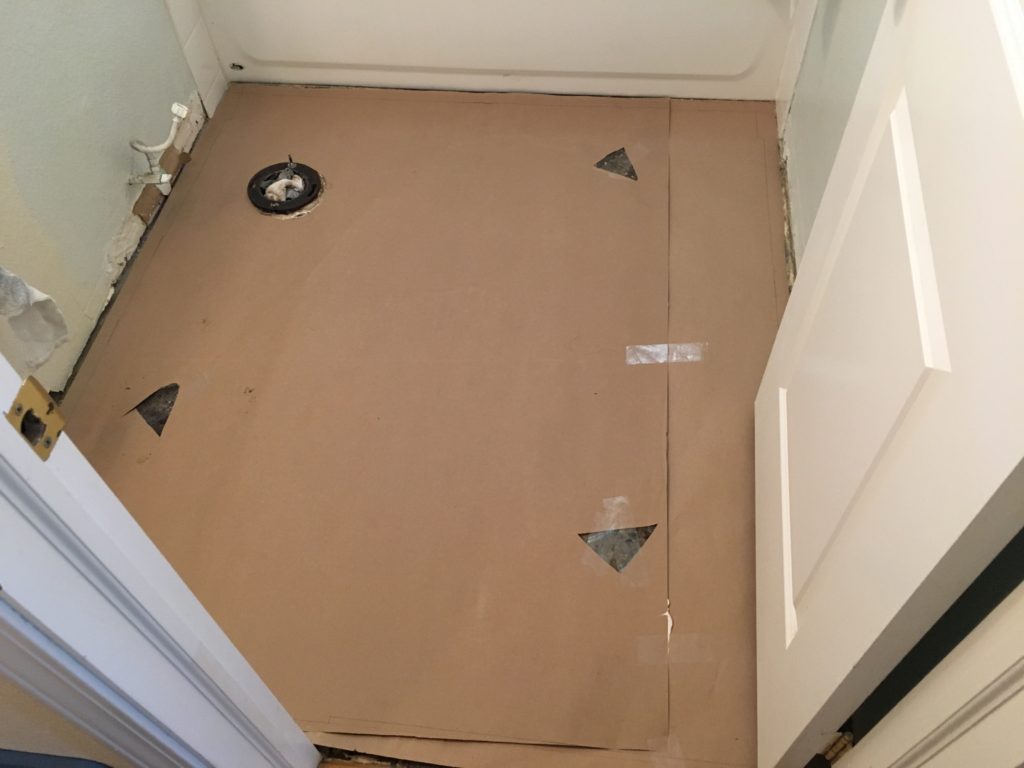
5. Once the floor is totally clean and dry, this is the perfect time to make our template. It’s easier to do now as the baseboards are all gone. We followed the suggestions in the resource link above from ThisOldHouse, but we used the butcher paper that came with our vinyl instead of some special paper. This step is absolutely critical, so take your time and mark everything well.
*Note: We actually used a thin ruler so that we can make sure we’re marking the template to allow a little excess of the flooring material to ‘tuck under’ narrow areas, such as under the transition. This was very important so that the new flooring would have a seamless transition with the bamboo hardwood in the hallway. The edges that will be covered by the baseboards we marked the template all the way flush to the drywall. I wanted to make sure there would not be any gaps along the edges, even though the caulk could probably cover small gaps. Along the edge of the bathtub, I made sure there was no more than a hairline gap between the edge of the tub and the vinyl.
6. We used our template to mark the best area of the sheet vinyl. For us, we wanted the orientation of the flooring to be the same in both bathrooms from the perspective of the hallway, so that’s what we did. We marked the sheet vinyl with a pen, and made note of each little nook and cranny.
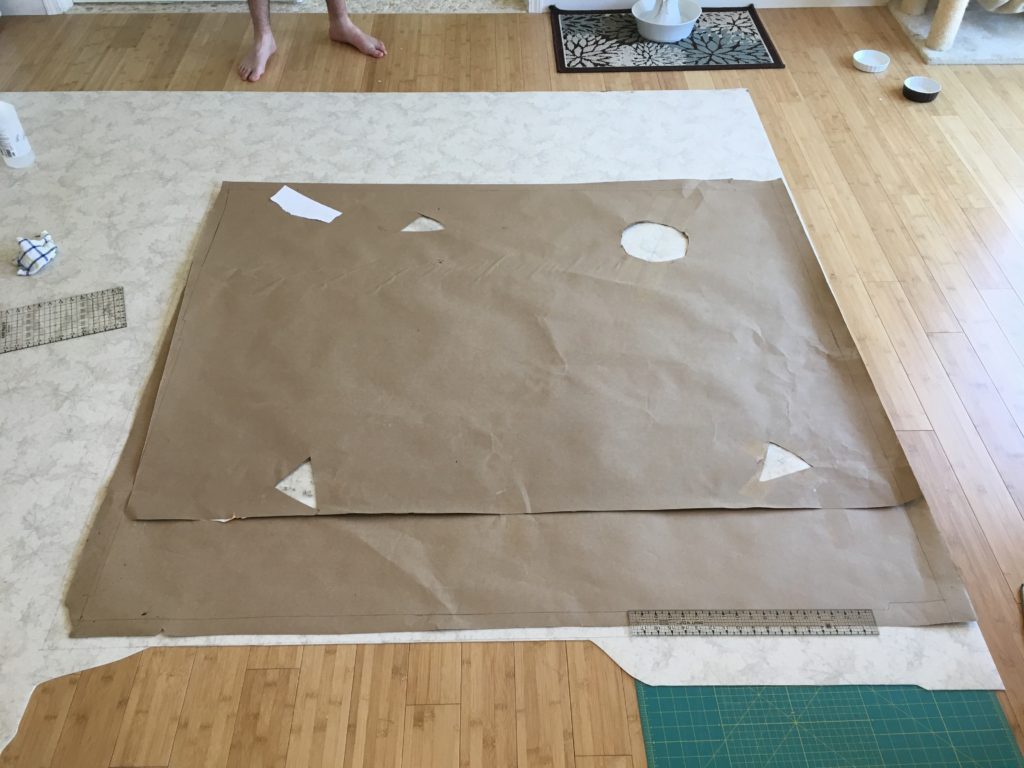
7. We cut along the lines we marked. For the first bathroom, we left a little extra material (about 1/4 inch) on each side, just to be safe. We found that it was a pain to trim down later, so we were careful to trust our template the second time, and it worked beautifully! The sheet vinyl can’t be too big anywhere, because that will cause a pucker (somewhere!) and your floor won’t be perfectly flat anymore. An indispensable tool for cutting the vinyl was hook shaped blades in our utility knives. We kept a cutting mat underneath while cutting the vinyl to protect our floors.
8. Then we dry-fitted the sheet vinyl in the space, being careful to minimize any bending or folding. We made sure that it fit perfectly and made any necessary adjustments, which were very minimal as the template and cutting was done very carefully.
9. Now that everything looks perfect, we wrangled/rolled half of the flooring in the space (very carefully!) and applied adhesive to half the floor with rollers (using sponge brush for hard to reach edges and corners). We then laid down that half of the floor, and repeated for the other side. In our case we decided to follow the instructions for a permanent installation, and applied adhesive to the entire floor space and not just the edges. This was a bit of a hairy step, so we only have one picture of the process, in the master bath.
10. Next we used that extendable roller and rolled it as much as possible! We started from the center and worked toward the edges, putting as much weight on the roller as possible. You can feel the difference after rolling; the floor is much more even and there no detectable glue/air pockets.
11. Finally re-install the cleaned toilet, vanity, baseboards, and caulk everything!
*Note: We caulked the area between the toilet flange and the vinyl flooring that fits around the toilet flange. If there is a leak, the only path for water is above the vinyl. I did this because I wanted to prevent another situation of water entering between the flooring and concrete subfloor.
For the toilet, I found information that said you should not caulk the toilet base; to allow leaks to be detected. I also found information that said you should caulk the base, to minimize gases and to stabilize the toilet. The video I linked above is a compromise and made a lot of sense, so that’s what we did.
We caulked about 90% of the toilet base (front and sides), which provides stabilization, and prevents dirty things from entering the gap. We left a small section behind the toilet un-caulked so that there’s a path for water to escape in the event of another leak. The entire premise of the toilet wax ring is to prevent leakage of liquid and sewage gases, so I’m not concerned with gas seepage while the wax ring is properly installed. We’ve even slid a piece of paper towel in the space to check that our install was water tight, which it was.

This project took about three weekends and a few days here and there. We worked on one bathroom at a time. There was some wait time as we spent a good day on cleaning the subfloor and then letting it dry. We also took our time and reviewed some resources along the way. Then of course, there were the runs to the store for more gloves, caulk, etc!
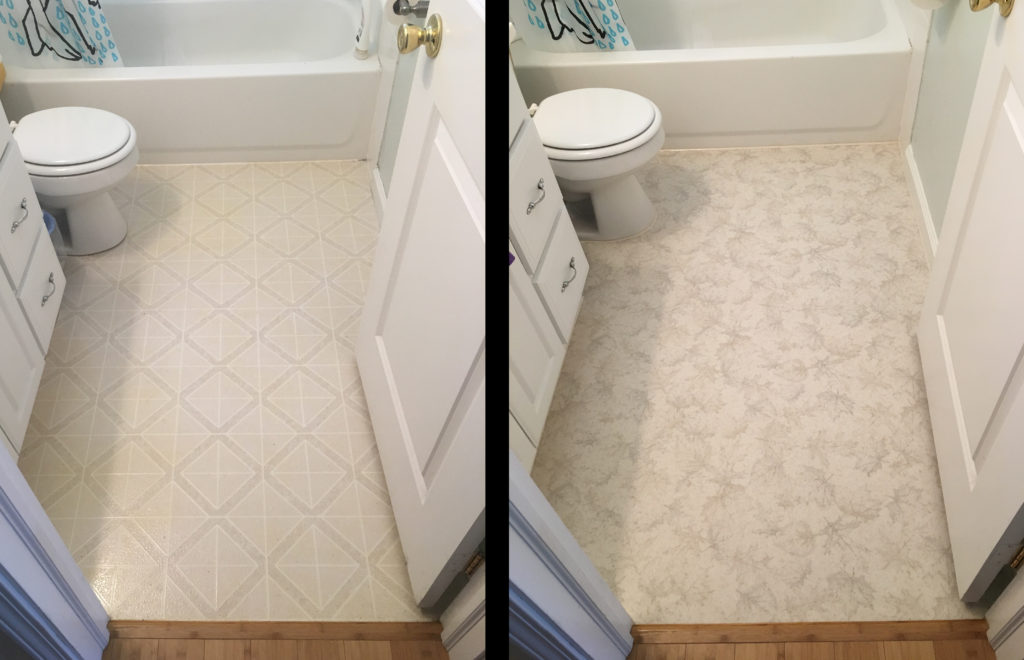
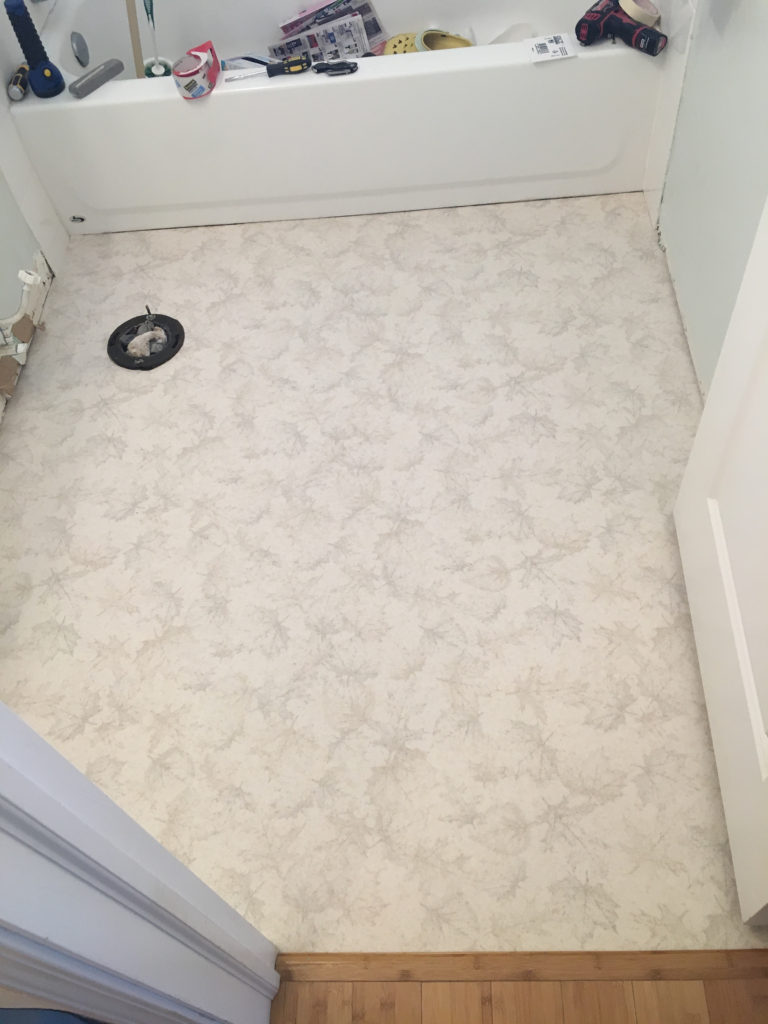
We were so happy when we were finished! We really love our new bathroom flooring.
It’s great to know that we fixed our leaky toilet. If there’s another leak for whatever reason in the future, there’s no path for the water to get between the flooring and subfloor; as the water could only escape via the back, this would quickly notify us of a problem. We could address the leak right away without waiting for other issues to emerge.
We love the look of the new flooring and the tiny bit of cushioning is really nice. The new flooring fit under our hallway transition perfectly so we didn’t need to fiddle with that at all, and (for the second bathroom, at least!) the caulking has never looked better. We really like the matte finish, which provides better traction than the old linoleum, and it cleans well and camouflages dust a bit better too.
Every project is a bit different, and this one was really scary for me, but we got through it and we learned so much. Next time we’ll be less scared!